About Me

We are building our own log home in Utah following the methods of the Log Home Builders Association (LHBA). After a lot of research we really felt that LHBA was the best way to go. We highly encourage you to visit the LHBA website at www.loghomebuilders.org. It seems crazy to think we can do this ourselves, but LHBA really makes you a believer! And remember, we welcome any help!

Sunday, November 4, 2012

Done for the Winter?

Although there haven't been a lot of posts, a lot has been going on. The whole roof is done, including all of the trim. And, the outside of the whole house is stained! It's exciting to have something that is "done". At first we were concerned that we might not be able to handle something as important as the roof on our own. But, Kenyon spoke with the guy at the roofing store several times, and he was extremely helpful. We felt like we would be able to do it ourselves. When I say "ourselves" I mean Kenyon.

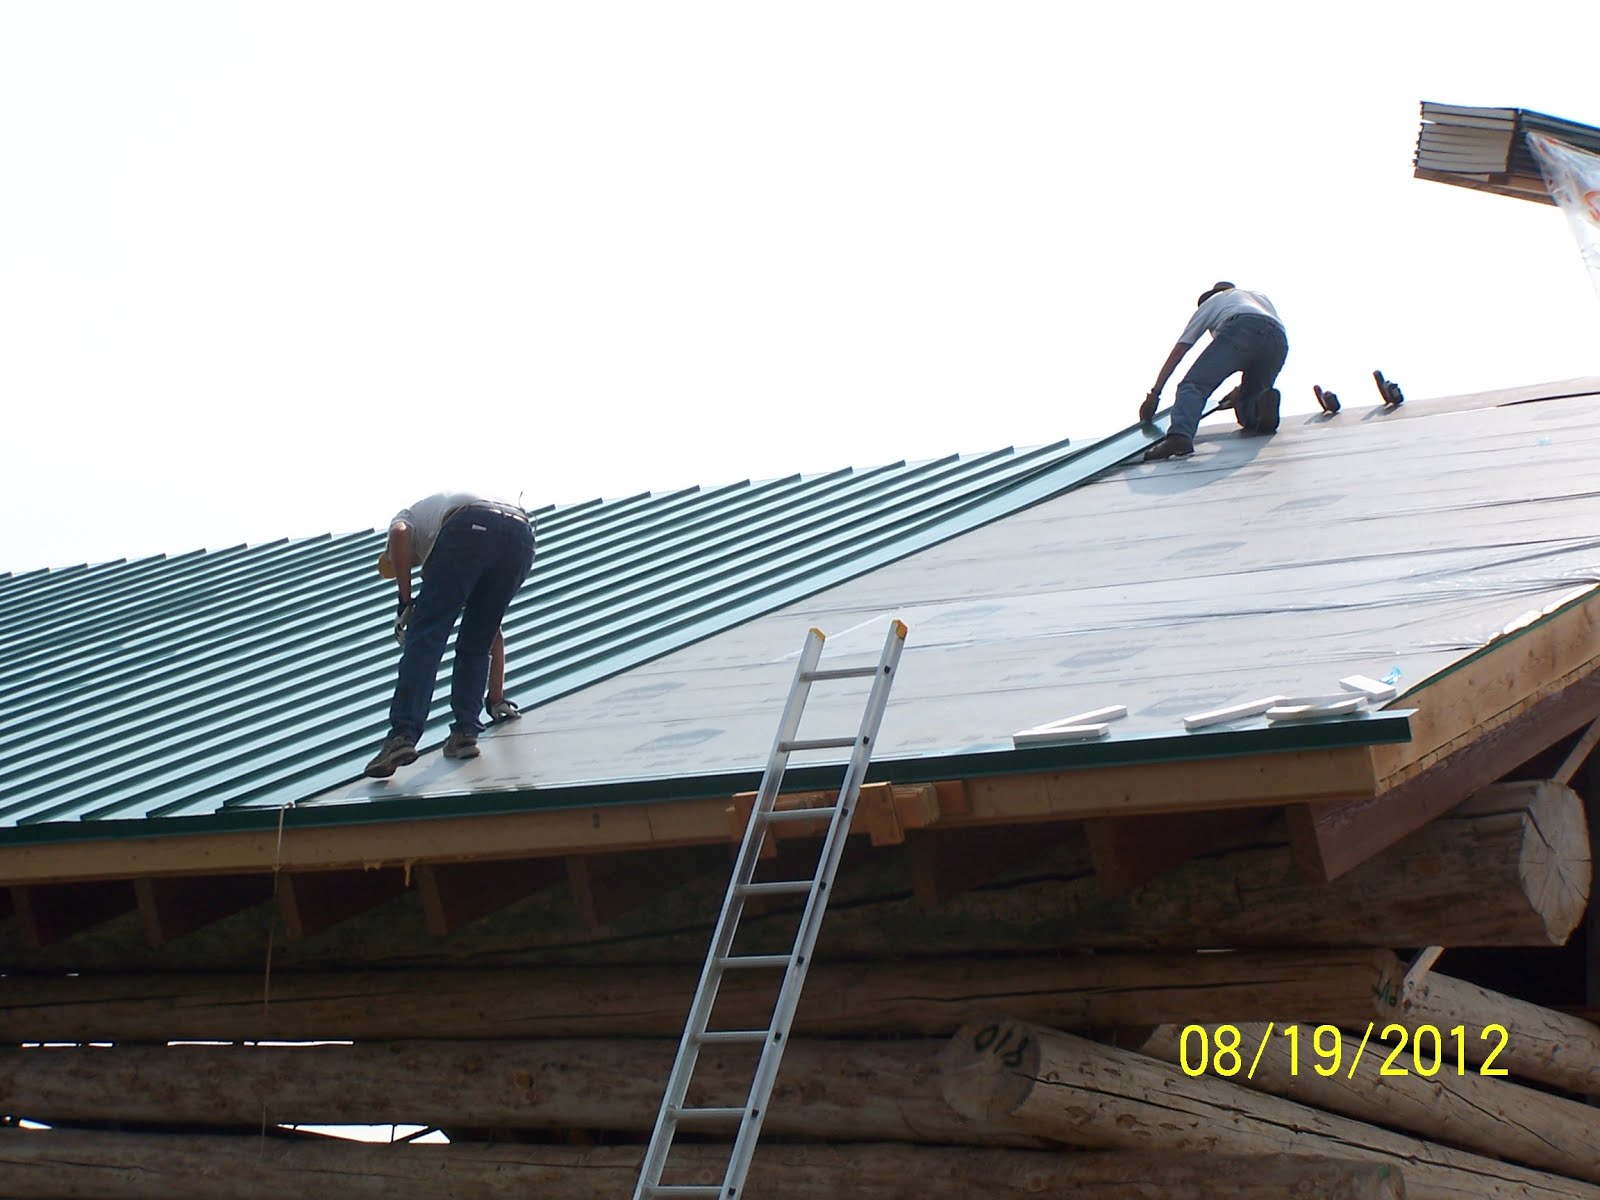
We learned that it's possible to do with 2 people up on the roof, but much easier with 3. The tough part was just manuevering the panels. For a metal roof, such as ours, the panels get made specifically for the length of the roof. So, this is one of those areas that having the bigger size house makes more difficult because that in turn makes the panels longer. The panels actually snapped together fairly easily.

We used the forklift to get the panels up to the roof.

After the first few panels on that side were in place.

Kenyon and his dad actually placing the panels. Between his dad, David and Hunt, we had some extremely valuable help this year. We couldn't have done it without them!

All of the roof panels on.

Another view of the finished roof.

Then it was time to stain. We had had a scare when we found out that the stain choice we had finally made, had changed. It wasn't exactly discontinued but they changed the name and the shades but you could still get the old colors. So, we went ahead and ordered all of the stain we would need for the outside just in case we wouldn't be able to get it in the future. I spoke with a salesman at one of the log home stores and he said that the company has since decided to no longer discontinue the old colors, thank goodness! Since we had all the stain, we decided we might as well go ahead and do that.

We have to try to find some shots of the actual staining. Basically, Kenyon had to go over all of the rough spots or spots where all of the bark hadn't come off and lightly sand them, and then apply the stain. We ended up using 3 coats of stain. My family was able to visit for a weekend, which was great. My dad and Kenyon worked all day each day he was here on the sanding and stain. It was a huge help, although it couldn't have been a very exciting vacation! But we're so fortunate to have been able to have the help!

All of the final trim was stained and put up.

We got everything done just in time for the first snow storm!

Luckily, the snow melted, so we may be able to do a little more, but we may also just stop. At this point, our next step is to put in the windows. We ordered the windows for the front wall, but we're not sure yet if we are going to go that next step or not. Next week it's supposed to start raining/snowing again, so the weather may be making the decision for us.


Tribute to the Yard Stick

It may be surprising but one of the most useful tools during this project has been a yardstick. I do not mean to imply that it is a single yardstick throughout the project, but many, many yardsticks! We buy them by the armload. One time we were at Home Depot or Lowe’s and were going through the checkout line with around 30 yardsticks, the guy looked at us quizzically, “You have some sort of school project?” Our response, “No, we’re building a cabin.” Doesn’t everyone routinely purchase hundreds of yardsticks when they’re building a house?

One time we were stacking logs with the crane, and Kenyon or I needed to measure something so we pulled out a yardstick. The crane operator looked at us like we were crazy and said, “Do you need to borrow a tape measure?” We assured him that the yardstick worked far better.

We have gone through so many, the area around our cabin is a veritable graveyard of yardsticks. Some are mangled, some are broken purposefully, some are warped from a year in the elements, and still others are probably OK, but have been sitting out so long they are covered in dirt so their straight edge is questionable.

Here’s why they are so useful:
- Other than the concrete walls, there are no straight lines or edges on the house, so to measure you need something that will stay flat (we often use in conjunction with a level)
- We used them to measure the heights of the walls as we were building
- We used them to fish straps between the logs to hold the logs in place
- We use them to create templates for drilling, etc
- We used them to measure the rebar on the chop saw before cutting, to reduce the amount of steps
- We used them to measure the height needed for rebar (1 ½ logs)
- We used them to show the center line of the logs
- We use them to extend the length of the concrete wall out far enough to measure up for windows and doors
- Most recently, (and the moment I realized the tribute was necessary) Kenyon used them as a “shoe horn” to get the wood trim up under the metal trim pieces that were already in place

If only there was a big market for yard sticks, I would try to get a sponsor or a job as a spokesman. I must say that I highly recommend the Lowe’s yard sticks because they are slightly thicker and more sturdy than others. Alas, I don’t think Lowe’s is going to be throwing any money at me for advertising yard sticks, perhaps because they cost about 30 cents each.


Finding the centerline of the first log and the concrete wall

Measuring the heights of the wall after each log

Template for nailing OSB

Another template, pre-drilling holes into wood trim

"Shoe horning" wood trim underneath metal