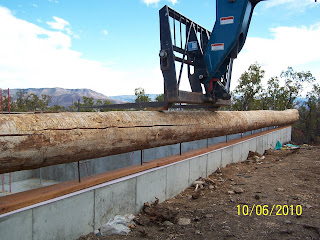
We have 4 layers plus one log done! It still seems like it is taking us too long, but when you figure we got our first load of logs 5 1/2 weeks ago, it's not too bad! Weather and work are keeping us away from doing anything the next few days. Luckily, it's just rain so far but the snow is supposed to start at the higher elevations this week. I can't say I'm too upset about having a couple days break!
If you see someone up next to the house it helps give you some perspective. After 4 layers, the walls are almost 6 feet tall!
After the first layer, you drive pieces of rebar through the top log into the bottom log. This is me cutting the rebar to length. We have to measure at each location and then I cut them.
Kenyon driving the rebar into the logs.
About Me
- Mumford
- We are building our own log home in Utah following the methods of the Log Home Builders Association (LHBA). After a lot of research we really felt that LHBA was the best way to go. We highly encourage you to visit the LHBA website at www.loghomebuilders.org. It seems crazy to think we can do this ourselves, but LHBA really makes you a believer! And remember, we welcome any help!
Sunday, October 24, 2010
Monday, October 18, 2010
2nd Course
Sunday, October 10, 2010
Whole First Course Done!
We haven't had any precipitation in almost 4 months, so of course this week it has rained every single day. There wasn't much we did this past week when it wasn't raining and windy. But, the second log was especially bad! It was pouring rain, windy, and there was some thunder and lightning. Being up on the edge of a mountain with a huge log with metal rods sticking out of the end didn't seem like the safest place....
So, there aren't any pictures of us actually putting the second log on! But, here it is, complete.
The third log is the downhill side. I was pretty nervous about taking the forklift down there at all, because they had to build up the dirt just to get to the floor level of the basement. So, there's the slope down, but that is all added in dirt and thus somewhat soft. Then, there's a steep dropoff back down to the real hillside. There's just enough room to sort-of maneuver the forklift.
This was the view from my vantage point inside the forklift. Thank goodness for those strong straps because if one of those would have broken not only would the log have fallen on me, I would have also toppled down the side of the mountain!
Three logs on!
Setting the 1st Log
To set the first log, we needed to pick it up from up at the road, take it down the ramp to the foundation and then "thread" it onto the rebar.
It takes awhile to make sure that the forklift is picking up the log at the right place to keep it level.
Since the holes are predrilled because we're placing the log onto the rebar, you have to make sure that you get it perfectly lined up. Annoying to find that you're 6 inches off, because it's not like you can just slide it. Maneuvering the forklift to your left 6 inches is no easy feat, trust me! We put a rod in the end holes to help us line it up on the ends.
Friday, October 8, 2010
Log Prep
We have been very fortunate that Kenyon's dad has been able to spend a lot of time helping us. Also, David Willson from LHBA has been up to help for several days. Without their help, we'd be much further behind, and there are some jobs that are just easier with more than 2 people!
In addition to getting the logs ready, we needed to get the foundation ready for the logs. Kenyon and his dad are making the sill plate, which is the pressure-treated wood that the logs have to sit on.
We made the decision to vary from the standard LHBA plans and hang our floor from the top of the foundation rather than from the log. So, prior to placing the logs, we needed to hang the joist hangers from the foundation. You will notice our pretty pink sill seal that will eventually form a barrier for the wooden joists from the concrete. Because our structure will be exposed (or hopefully only semi-exposed) through the winter we aren't actually putting in the floor until next year.
Since we have to place the log down onto the rebar for the first layer of logs, we need to make a template of exactly where the rebar is on the wall to know where to drill our holes into the log. The template was then placed on the log, centered, etc etc.
The first hole being drilled into the log!
As if drilling with that big of a drill wasn't fun enough, check out the 36" drill bit! We had a good 4-man team to make sure the drill was going in straight. Perhaps overkill, but those holes were straight!
Am I Allergic to my House? (aka Cleaning logs)
We received our final load of logs, so barring any problems with any of them we should be all set as far as logs go.
Now that the unexpectedly difficult part of getting the logs is settled, our next difficulty is removing the bark. Luckily, the logs were dead-standing when they were cut down so a lot of the bark has already fallen off. We've taken lots of suggestions from the LHBA forums and have been using a spud (scraper looking thing) and a pressure washer to try to get the bark off.
Although it looks like I'm the only one working, trust me that wasn't the case! In addition to the bark you have to remove a layer underneath the bark to get to the wood. Below you can see the difference between a totally clean log and one with the bark off but the underlayer still on.
Here's what we learned - it takes a really long time to get the log completely clean. So, once again, following advice and others' experiences from the forums, we decided to remove the bark but come back after the walls are up and sand off the cambium layer, the pressure washer can create splinters that would need to be sanded anyway. The main reason for skipping these steps is that we are in a race against the snow due to our log delays.
I am the official expert pressure washer user. Unfortunately, the pressure that you need to get the bark off is strong and bark and water fly everywhere. So, I was constantly covered in dirt, bark, and water. Luckily, we had an unseasonably long summer so I wasn't too cold. (The picture doesn't show how my face and hat were also covered in grime!)
I started noticing that I was getting hives all over during this step. So, after an incredibly uncomfortable 6 days, I finally went to the doctor, who confirmed I was having some type of allergic reaction. The doctor and I had a lengthy discussion, and we just can't come up with many other ideas other than the fact that I am allergic to the bark. So, apparently, I'm allergic to my house. In an effort to think positively, we're going to assume that the reaction is actually to a bee sting I had gotten the week prior, or at the very least, something that was on the bark, not the actual bark. I guess only time will tell!
Once the bark is removed, we had to treat the logs with chemicals to prevent insects and mold.
Getting closer!
Sunday, September 26, 2010
More Logs!
We received our second (and hopefully final!) load of logs on Saturday. We have been really busy peeling the bark. So busy in fact that everyone has been sleeping very soundly! Needless to say, we're not getting messages posted too often. I will try to post some new pictures in the next few days as time allows.
A BIG thank you to David Willson, a fellow LHBAer, who came out and helped on Saturday! It was great having an extra pair of hands. He helped us peel logs and roll logs - on purpose!
More to come...
A BIG thank you to David Willson, a fellow LHBAer, who came out and helped on Saturday! It was great having an extra pair of hands. He helped us peel logs and roll logs - on purpose!
More to come...
Monday, September 20, 2010
1st Weekend with Logs
Now that we have logs, we have to get moving! We were able to get a lot done because Kenyon's parents came to help - his dad helped with the building jobs and his mom took care of the kids.
This weekend we started working on cleaning up the logs. Luckily, most of the bark was already off since the logs were dead standing. There's also another layer called the cambium layer before you get to the wood, that we need to remove. This was taking a REALLY long time. Since we're racing the "snow" clock we decided to get what we can off, and we'll sand the rest of the cambium off later. Most of my weekend was spent with the pressure washer working on the logs.
You wouldn't believe how dirty I got. My pants, socks, and boots were soaking wet and I had bark chips on my face, in my hair, and covering my clothes!
One of the projects Kenyon and his dad started working on was the sill plate. This is a layer of pressure-treated wood that will go on top of the foundation and the logs will sit on.
In order to drill the holes into the sill plate for the rebar, we had to buy a generator (which we'll need for numerous other things). So, now we have power, water, shelter (by way of tent and shed) what else do we need?
Thursday, September 16, 2010
LOGS!!!!
It actually happened! We got our first load of logs today. Granted we were expecting to get logs the 2nd week of June, but three months, a different species, and 5 loggers later - here we are! The second (and hopefully final) load should be here in 1 week. We were hoping for 10-12 inch tips with 14-16 inch butt ends, but we got about 20 inch butt ends!
Notice my feet don't even reach the ground!
The entire unloading process took about 25 minutes!
Tuesday, August 31, 2010
Still Waiting
Well, you will notice no new pictures of logs. That's right, we're still waiting. I think we're on logger number 4 or so at this point. The most frustrating thing is that they keep saying, oh yeah, we can get that for you but it will take X weeks. So, we wait and then 1-3 days before the expected delivery, they suddenly can't deliver. I would rather you just tell me immediately you can't do it! So, we've had a TON of wasted time this summer. This whole thing is getting us a bit depressed about the whole process, so I haven't been blogging much, so if you're eagerly awaiting an update or a response, I apologize!
That is Pineview in the background! I'm sure we'll need a lot of help next summer too (if we ever get logs)!
Wednesday, July 14, 2010
Compound & Concrete Ties
Here are the pictures of the final Mumford compound. I liken it to the Kennedy Compound, but I'm guessing the Kennedy's have indoor plumbing.
You can see our tent, the canopy that has the picnic table, the canopy that has the little play structure, kid picnic table, and the airplane teeter-totter.
Concrete ties are pieces of metal that go all the way through the cement wall and hold the forms in place when they are pouring the walls. Once the wall is done and the forms have been removed, the ties need to be broken off.
A wall with all the ties.
Kenyon breaking off concrete ties. I also helped with this task, just no good pictures!
Underground Plumbing & Grading
Still no logs. Here's what has been going on: The pipes were laid for the rough plumbing. This is everything that needs to go underneath the slab/basement floor. Once the pipes are laid then the basement gets filled with gravel, and the concrete slab can be poured (this is a next step).
Subscribe to:
Posts (Atom)